

Quick Answer: To use a herpes rapid test correctly, wash your hands, collect your blood sample carefully, wait the full processing time, and read the test strip exactly when instructed. Faint lines may still mean positive; invalid results require a retest.
What’s In the Box (And Why It Matters)
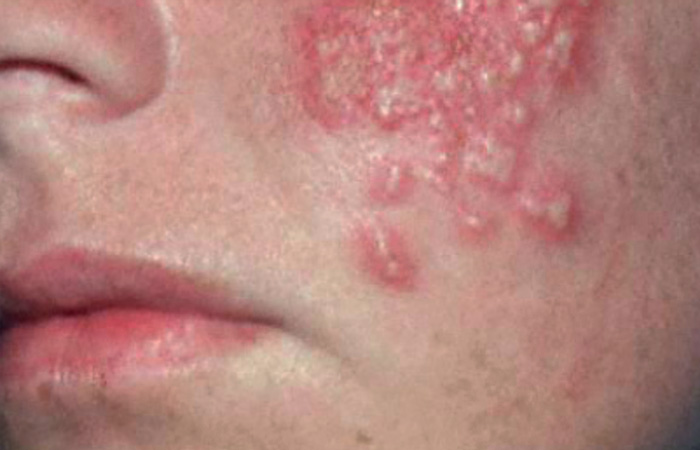
Herpes test kits don’t look like much when you open them. A few plastic packets, a small test cassette, a tiny vial of liquid, and a sharp lancet that might make you hesitate. But each component plays a crucial role. Mishandling even one piece, like touching the cassette window or storing the kit in your car’s glovebox, can make your result unreliable.
Imagine someone tossing the kit in a gym bag for two weeks in 100°F weather. That heat can affect the test’s antibodies, leading to a false negative. Or picture someone opening the desiccant packet but leaving the cassette out for 30 minutes before starting. Moisture can creep in, breaking down the detection strip.
Most herpes rapid test kits will include: A sealed test cassette, a lancet for fingerstick, a capillary dropper or pipette, a buffer solution vial, an alcohol swab, and, of course, instructions.
Storage matters. Keep your test in a cool, dry place, not a steamy bathroom or overheated car. The test cassette is a delicate tool calibrated to react with antibodies in your blood. Messing with that calibration, by heat, moisture, or contamination, puts your results at risk.
Set-Up Checklist: The Five-Minute Pre-Test That Saves You From a Redo
You might think you're ready to dive in once the box is open. But skipping prep steps is the fastest way to mess up your result. Herpes tests require your full attention for 15–20 minutes. No distractions. No cutting corners. Because if you miss your timer or fumble the blood drop, the whole kit becomes useless.
Start by washing your hands thoroughly and drying them completely. Find a flat, clean surface and lay everything out. Don't open anything until you're ready. If your hands are sweaty or cold, rub them together to increase blood flow, this helps when using the lancet.
One common mistake? Not reading the instructions until after you’ve already pricked your finger. Once the blood is flowing, the clock starts ticking. You’ll need to act quickly, so review everything first.
Another real-world misstep: Kelsey, a college student in Michigan, used a rapid test in her dorm late at night. She was nervous and didn’t realize the capillary dropper needed to be held vertically. Instead, she tilted it, causing an air bubble that blocked part of the blood sample. Her result? Invalid. She had to reorder and retest a week later.
The Blood Draw Moment: It’s Less Dramatic Than You Think
This is where many people freeze. But the lancet is designed for minimal pain, it’s a single-use device that quickly pricks the side of your fingertip. The key is pressure and angle. Don’t jab. Press firmly and steadily until it clicks. Use the side of your ring or middle finger, not the pad, that’s where nerve endings are most concentrated.
After pricking, gently squeeze your finger from the base toward the tip. You want a hanging drop of blood, not a smudge. Use the dropper to collect exactly the amount shown in the instructions, usually 1 to 2 drops, and deposit it into the sample well on the cassette.
Then, add the buffer solution, often 2 drops into the same well or a second one depending on the kit model. This liquid helps carry your blood along the test strip where it interacts with herpes-specific antibodies.
Here’s the kicker: once the blood and buffer are added, the cassette needs to sit undisturbed. No shaking. No tilting. Don’t pick it up “just to check.” Set a timer for the exact window specified (usually 10 to 15 minutes). Reading the result too soon, or too late, can make your test invalid.
| Step | What Can Go Wrong | How to Fix or Avoid It |
|---|---|---|
| Pricking finger | Too shallow or too deep prick | Use side of finger, press steadily, warm hands first |
| Collecting blood | Air bubble or insufficient sample | Hold dropper vertically, let blood drop form naturally |
| Adding buffer | Wrong number of drops or added to wrong well | Follow instructions exactly, double-check cassette |
| Waiting for result | Moving cassette or reading too soon/late | Set timer, place on flat surface, do not touch |
Table 1. Most common herpes test mistakes and how to avoid them. A few minutes of prep can prevent a wasted test and emotional stress.
Reading the Result: This Is Where Panic Can Ruin Precision
You’d be surprised how many people screw this part up, not because the test is hard to read, but because anxiety hijacks logic. There’s a lot riding on that tiny window. You’re staring at it like it holds your fate. And if you’re like most first-time testers, your mind starts racing. Is that a line? Is it fading? Am I seeing things?
Here’s what to look for: Most herpes rapid tests are lateral flow devices. That means blood travels along a strip and interacts with antibodies. The result window usually has two areas, Control (C) and Test (T). A visible line at C means the test is valid. A visible line at T indicates a positive result for herpes antibodies. No line at T? That’s considered negative, as long as the C line shows up clearly.
If there’s no line at C, the test is invalid. Doesn’t matter what’s happening at the T spot. Control line missing = throw it out. You’ll need to retest.
But what about a faint line at T? That’s where people get stuck. A faint line can still mean positive. In fact, in many kits, any visible line, no matter how light, is considered reactive. The darkness of the line doesn’t correlate with how “strong” the infection is or how contagious you are. It simply indicates the presence of IgG antibodies.
Case in point: Angelica, 32, was asymptomatic but took a test after a partner disclosed their status. She panicked when the T line was barely visible, so she assumed it was negative. She tossed the test. Weeks later, after another partner developed symptoms, she tested again, this time positive, with a clearer line. Don’t guess. Confirm with repeat testing or speak to a provider.
People are also reading: Queer, Unvaccinated, and At Risk: How HPV Hits Gay Men Hardest
What Faint Lines Can Mean (And What They Don’t)
Faint lines trip people up all the time. We’re wired to think “darker means positive,” but that’s not how these tests work. A faint line can mean your body’s just starting to produce herpes antibodies, or that your blood sample was a bit light. Sometimes the timing’s just on the edge, early enough for a line to show, but not bold yet. Bottom line? A faint line still counts. Don’t overthink the shade. Take a photo, breathe, and follow up if you’re unsure.
And yes, sometimes a faint line is an artifact, especially if the result is read too late. If you stare at the cassette an hour after the test time, you're likely seeing evaporation marks or background noise. Always read your result in the time frame the test instructs, usually between 10 and 15 minutes after buffer is added.
If you’re unsure, again, take a picture of the result at the correct time frame and compare it to the visual guide in the instructions. Many test manufacturers also provide online galleries or customer support. Still confused? Retest after 2 weeks or seek a lab-based confirmation test like a Western blot or ELISA through a provider or online lab network.
| Test Appearance | Interpretation | Next Steps |
|---|---|---|
| Strong line at C, no line at T | Negative result | No herpes antibodies detected; retest if exposure was recent |
| Strong line at C, clear line at T | Positive result | Suggests prior herpes exposure; confirm if needed |
| Strong line at C, faint line at T | Likely positive | Retest in 2–4 weeks or confirm with lab test |
| No line at C, any line or no line at T | Invalid result | Discard test and repeat with new kit |
Table 2. How to interpret common herpes test outcomes. Faint doesn’t mean false, timing and control lines matter most.
When the Test Is Invalid (And How to Avoid It Next Time)
There’s nothing more frustrating than working up the courage to test, only to get no result at all. You did the prep, followed the steps (you think), and still, the test stares back at you with... nothing. No control line. No verdict. Just limbo.
Most of the time, it’s not your fault. Maybe the buffer didn’t land where it needed to. Maybe the cassette got nudged mid-process, or the blood sample was too small to flow properly. Even opening the kit too early, testing in a humid room, or using expired components can throw things off.
We’ve heard it all, like one guy who tried testing in his car on a lunch break. The cassette slipped off the console while developing, and the liquid pooled in the wrong place. No control line. No dice.
If this happens, don’t try to salvage it. Don’t add more buffer or reuse anything. Just toss the kit and start fresh. Everything in that box is designed for one use only, for good reason.
And if it happens again? Change your setup. Use a solid surface, follow the timing exactly, and stay steady. It’s not about perfection, it’s about giving the test what it needs to work. A failed test doesn’t mean you failed. It just means round two might go smoother now that you know what to watch for.
Disposal, Privacy, and Emotional Fallout
So the test is done. You’re either staring at a line, no line, or some ghost of a maybe-result, and now comes the aftermath. First, the practical stuff: the lancet goes in the trash, sealed inside its original wrapper or a tissue. The cassette and buffer vial are also tossed in the regular bin unless your instructions say otherwise. There’s no biohazard risk to your household garbage, but if you feel more comfortable sealing items in a zip bag, do it.
More importantly: give yourself space to breathe. Results, especially unexpected ones, don’t land quietly. Whether it’s relief or panic, numbness or guilt, your brain needs time to process. This is especially true if you got a faint line or a positive result and weren’t expecting it.
Marcos, 26, described his reaction like this: “I felt like I fell through the floor. I just sat there on the edge of my tub with the test in my hand, thinking: now what?” That “now what” is valid. It’s where many people stall out. But it’s also where control begins. You took the test. You did the hard part. Now you’re not guessing, you’re planning.
Herpes is extremely common, especially HSV-1. Many people carry antibodies without symptoms. A positive result doesn’t mean you’re dirty or doomed. It means you now have information to make choices, from disclosure to treatment to prevention.
Order Now $75.00 $98.00 Check Your STD Status in Minutes
Test at Home with Remedium
Genital & Oral Herpes Test Kit
 For Men & Women
 Results in Minutes
 No Lab Needed
 Private & Discreet
For all 2 tests
Should You Retest? When and Why It Matters
If you tested during a window period, meaning it’s been less than 3 weeks since possible exposure, your body might not have produced detectable antibodies yet. In that case, a negative result could be a false negative. Even with a faint positive, some people opt to confirm with a different method.
Here’s how to think about timing: herpes IgG antibodies typically become detectable 3 to 12 weeks after exposure. Rapid tests pick up on those antibodies, not the virus itself. That means testing 5 days after a one-night stand might be too early. It also means that if you’re positive but asymptomatic, it could reflect an older exposure, not a recent one.
Retest if:
, You tested within 3 weeks of potential exposure , Your result was faint or ambiguous , You had symptoms but got a negative , You want a second opinion before disclosing to a partner
And yes, some people choose to test every 3 to 6 months, especially in open relationships or during periods of dating multiple partners. That’s not paranoia, it’s responsible health management.
| Situation | Should You Retest? | Recommended Timing |
|---|---|---|
| Exposure less than 3 weeks ago | Yes | Retest at 6 and 12 weeks |
| Faint positive line | Yes | Retest in 2 to 4 weeks or confirm with lab |
| Negative result but symptoms appeared | Yes | Retest in 7 to 10 days |
| Positive result, no symptoms | Optional | Confirm with second test if uncertain |
Table 3. When to consider a retest after using a herpes rapid test. Timing matters more than panic.
How to Talk About It (Even If You’re Still Processing)
This part’s harder than the testing. But you don’t have to rush. If your test came back positive, you may need to tell a partner, ex, or future lover. The key is to speak from a place of grounded truth, not shame. You’re not confessing a crime. You’re sharing a fact about your body so someone else can make informed choices.
Try starting with: “Hey, I just wanted to let you know, I took a herpes test and it came back positive. I don’t have symptoms, but I thought you should know.” That’s enough. You don’t owe a medical history, an apology, or your trauma. Just the facts.
Some people also choose to text or use anonymous partner notification tools (like TellYourPartner.org) if the relationship context is unsafe or sensitive. Do what makes you feel emotionally protected while staying honest.
Remember: disclosure is about care, not character. And testing doesn’t make you dirty. It makes you proactive. This test didn’t define you. It armed you.

People are also reading: Do You Need to Worry About Herpes from Sharing a Water Bottle?
FAQs
1. What if I see a faint line, am I positive or not?
Yeah, this one trips a lot of people up. A faint line on the “T” usually still means positive. It doesn't have to be bold or dark to count. Think of it like a pregnancy test, if the line shows up in the test window (within the right time), your body is likely producing herpes antibodies. Still doubting it? Retest in a couple weeks or confirm through a lab, but don’t dismiss a faint result as nothing.
2. Can I take the test right after exposure?
You can, but you probably shouldn’t. Herpes antibodies don’t show up instantly, they take time to build. Most people won’t test positive until at least 3 weeks after exposure. Testing earlier might just leave you more confused. If you’re in the “just exposed” window, set a calendar reminder to test again at 6 and 12 weeks for clarity.
3. How do I know if my test was invalid?
If the control line (C) didn’t show up at all, your test didn’t work, period. That line has to appear to prove the test ran correctly. It’s like a “power on” light. No C line = no trust in the result. Toss it, breathe, and try again with a fresh kit. Don’t reuse anything.
4. Is the finger prick as bad as it sounds?
Honestly? It’s not that bad. It feels like a tiny pop or snap, less painful than stubbing your toe on furniture or tweezing a thick brow hair. Warming up your hands first helps, and using the side of your finger (not the pad) makes it sting less. You’ve definitely felt worse.
5. I don’t have symptoms, should I still test?
Yup. Most people with herpes don’t have obvious symptoms, especially if it’s HSV-1 genitally or a really mild case. So just because you’re not breaking out doesn’t mean you’re in the clear. Testing gives you power, whether it’s reassurance or a wake-up call.
6. Could another STD mess up my herpes test?
Not likely. Herpes rapid tests are designed to target herpes-specific antibodies (IgG). So even if you’ve got something else going on (chlamydia, gonorrhea, etc.), that shouldn’t affect the herpes result. But heads up: if you’re worried about more than one STD, a combo test might be the better move.
7. What should I do after a faint positive?
First, don’t spiral. Take a picture of the result (within the right time window), then decide: do you want to retest in 2–4 weeks, or go straight for a lab confirmation? Either works. Don’t ghost your body. And don’t sit on the anxiety. Action = relief.
8. Can I reuse parts of the test if something goes wrong?
Nope, sorry. Even if your sample didn’t flow right or you messed up the drops, once the cassette is exposed to air and fluid, it’s done. You need a fresh lancet, cassette, and buffer each time. Think of it like trying to re-toast burnt bread, just...don’t.
9. What if I panicked and read the result too early?
It happens. You’re anxious, the timer’s still going, and you peek. But reading too soon can throw things off, lines might not have developed yet. Best move? Retest and this time, set a timer and walk away. Seriously. Trust the process.
10. Can I trust a home herpes test more than a clinic one?
Home tests are solid, accurate when used right, and great for privacy. But clinics offer backup: trained staff and confirmatory labs if needed. Bottom line? If you follow the steps, at-home results are legit. Go with what feels right for you.
You Deserve Answers, Not Assumptions
Taking a herpes test at home can feel like a heavy emotional lift, but it’s also a powerful act of care. You’re choosing clarity over fear, facts over guessing. That’s not something everyone does. Whether your result was negative, faint, or fully positive, you now know where you stand. And that knowledge lets you make choices rooted in truth, not shame.
If you’re still unsure, it’s okay to test again. It’s okay to wait. It’s okay to reach out to a partner, or not yet. This process is yours. And whatever comes next, you’ve already taken the first, and hardest, step.
Need help deciding what to do next? This combo kit checks for multiple STDs discreetly and can help you stay ahead of uncertainty.
How We Sourced This Article: We combined current guidance from leading medical organizations with peer-reviewed research and lived-experience reporting to make this guide practical, compassionate, and accurate.
Sources
2. Genital Herpes , STI Treatment Guidelines, CDC
3. Screening for Genital Herpes – CDC
4. Herpes Simplex Virus – WHO Fact Sheet
5. Diagnosis of Herpes Simplex Virus: Laboratory and Point‑of‑Care Tests (PMC)
6. Comparison of the Accuracy of HSV‑1 and HSV‑2 Antibody Testing (PMC)
7. Herpes (HSV) Test – MedlinePlus
8. Herpes Can Happen to Anyone – NIH News in Health
About the Author
Dr. F. David, MD is a board-certified infectious disease specialist focused on STI prevention, diagnosis, and treatment. He blends clinical precision with a no-nonsense, sex-positive approach and is committed to expanding access for readers in both urban and off-grid settings.
Reviewed by: Maya Thompson, RN, MPH | Last medically reviewed: October 2025
This article is for informational purposes and should not replace all medical advice.


